Showing posts with label wall arrangements. Show all posts

1.26.2010

Easy DIY Wall Decor

I haven't "crafted" in several days, which in turn has made me a very unhappy Mrs. Finesse Your Nest.  So, what to do, what to do?

I put together some really QUICK, really EASY DIY Wall Decor for my master bedroom.  Remember the "Art" I made last week?


I was so pleased with how it turned out.  The frames were $4 a piece on sale at Michael's & the scrapbook paper came in a big pad marked down to $11.99.  I still had tons of it left over, so I made this...


Want a closer look?


I had a bunch of mismatched frames that I spray painted white, when I had my super duper crazy from the fumes spray paint party a few weeks ago.

I just cut my scrapbook paper to fit the opening, removed the glass and voila!  Instant art!


Went a little crazy with this one.  It's a frame hot glued to another frame.  The little matching tags came with the scrapbook paper so I penned a little "W" (our last name initial) in orange sharpie.  This may be a craft gone bad.  We'll see if it grows on me!

I also made some burlap pieces after I was inspired by this...


I found some really cute binder clips at Michael's in the Dollar section (I love the dollar bins at Michael's!  So many treasures!) and I made my own version!


That's me and the little peeps. It's a REALLY outdated pic, but haven't printed anything lately so I just stuck something in there for now!


I'm linking up to:

1.21.2010

Better Master Bedroom in the Making!


I'm participating in Amanda's "Show Me the Progress" party!  A couple of months ago, during her "Decorating Dilemmas" party, I shared the nightmare dilemma that was my master bedroom.  It hasn't been touched since we moved into our home 3 years ago.  Well, unless you consider slapping a couple of pieces of art on the wall and making the bed quality decorating!

I got a lot of great advice from fellow partiers (a big Texas thanks & a smooch to you!) and
 started the "transformation".

Here is what I call "the bed wall" BEFORE...

Not bad, but lacked some "oomph".  Some of the advice I got:  1) art or mirror over the bed and take the 2 pieces on the sides down and 2) More substantial lamps (yeah, they do look pretty "wimpy")

And here is my quickie transformation (Now imagine that the walls are painted a robin's egg blue or a light blue-gray color (Paint is coming later!)

Better right?

I want to eventually replace the bedding as well, but can't decide what.  Thinking once I get the walls painted, a crisp white might be nice with pops of color in the throw pillows.  Your thoughts?


Hello Lover!

I found the lamps at Home Goods for $39.99 a piece.  I stood in the lamp aisle for at least 30 minutes trying to talk myself out of it (the other customers definitely thought I was looney!), but the lamps won!  Home Goods is dangerous.  It's like heroin for wannabe decorators!


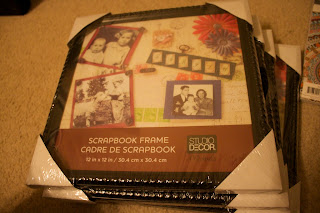
I bought these 12x12 scrapbook frames at Michael's on sale $4 a piece.  They have a nice 1" wood (or plastic that resembles wood) moulding with a rope design.


Then I saw this jumbo pad of 12x12 scrapbook paper, marked down to $11.99.  I used 4 sheets for the art project and still have a ton left to do other things with!


This took me 5 minutes to put together and about 10 min to hang (using my trusty laser level that I love!)

Remember my "wall of furniture" from before and all the clunky dark accessories?


I moved the dresser to the bathroom wall.  I was worried it would block the path to the loo, but it works!  I got rid of all the clunky accessories.  It looks a little "bare", but it's a work in progress.  Another comment was to hang the mirror.  I turned it to horizontal instead of vertical, which I think looks much better.  Eventually, I want to get a round mirror.


And here's where the "wall of furniture" was.  I angled the armoire in the corner.  Not sure what to put on top and the wall next to it needs something dramatic (and the TV cords need to be concealed, yuck!)  Any ideas?


I had these cute little cube ottomans that I bought at Target for $15 a piece.  I think the colors work in the room, but not sure exactly what to do with them yet.


I also added this slipper chair.  I just felt like there was so much "WOOD" in this room and an upholstered piece might break it up a bit.  What do you think?  Good?  Bad?


The window is seat is still....well....the window seat.   That will be my next project.  I got lots of good advice on window treatments, cushions, etc.


I bought these shower curtains at Home Goods last year, 4 for $7 a piece.  They are white with a dark brown dot border.  Was thinking of transforming them into some sort of window treatment.

So, how am I doing so far?  Any comments or suggestions are truly (and I mean truly) appreciated!


Thanks again to Amanda for hosting this update party!  I hope to have my patio underway for the next one!


12.11.2009

2 easy holiday wall arrangements


I picked these unfinished letters up at Hobby Lobby for $2.99 a piece (which is why I spelled JOY, instead of a longer word!)  I spray painted them white and tied a tiffany blue bow around the "O".  These hang on one of the columns in my kitchen.


 Sorry another fuzzy pic, and it's a little "yellowy" (was taking without a flash).  I tacked up a snowflake ribbon, floor to ceiling, to the column that separates my dining room from the foyer and tacked a bow to the top.  I will use this to display all the wonderful Christmas cards we get this year.  I'm using 3M mounting tape to attach the cards to the ribbon.

12.07.2009

Fun and festive wall hanging


This week I linked this project to Strut Your Stuff Thursday @ Somewhat Simple  and DIY Day at A Soft Place to Land

I also linked up late to Living With Lindsay's Impromptu Linky Party!

Check these blogs out for more creative decorating ideas!

Here is the last of my holiday decorating workshop items.  This wall hanging is SO easy to make!


I found this idea on Martha's website (me and Martha are on a first name basis!)  Here's the how to:

1) Buy any size artist's canvas at a craft or art supply store.  I used a 20x30.

2) Using a Sharpie marker, draw your design in a dotted fashion on the canvas.  I drew freeform flowers.  Some other designs might be:  Star, last name initial, Poinsettia, or Christmas tree.

3) Use a small Phillips head screwdriver to gently punch a hole through each dot in your design.  Canvas is pretty durable, so don't worry about using a little pressure.

4)  Get 2 strands (you may need 3 if your canvas size is larger than 20x30 or if your design is intricate) of Christmas lights.  Inspect your lights to be sure each bulb is working.  Change any burned out bulbs if necessary.

5) Turn the canvas over and make sure the plug is at the bottom.

6) Start placing an individual light through each hole in the canvas, using clear packing tape to secure the strand as you go.  

7) Using small finishing nails, nail two nails about 3.5 inches apart at the top of the canvas on the wood frame.

8) Wrap each nail with floral or picture hanging wire creating a hanger.  You can cut the wire to any length you want, depending on how long you want your ribbon bow to be.

9)  Use a 10 lb nail or picture hanger to hang the canvas.

10) Use your choice of 1.5 - 2" satin ribbon to cover the wire hanger.  I wrapped my ribbon around the hanging nail and secured the ends to the back of the canvas with clear packing tape.  Take another piece of ribbon and tie a bow around the top.

11)  Plug into an extension cord to light.  I taped my extension cord to the wall behind the buffet and placed a larger object in front of it on the tabletop so you don't see the cord.

Here is the little vignette I put together in my formal dining room.


I'll be posting again later this week, to show you in more detail the "beachy christmas" tablescape on my buffet.

For the lighted canvas, you could also lean it up against the wall on a tabletop, or on the floor if you are using a large size canvas.

You could also use colored lights and you could paint the canvas before you start the project if you don't want white.

7.08.2009

BIG ways to fill wall space without spending BIG bucks!

I love the impact of all white frames. The different shapes keep it interesting. You could paint (spray paint is your friend, yes, it is!) all those old, dinged up frames you have laying around to get the same look! (photo BHG)

Think beyond the architectural pieces you find at Kirkland's and the like (*yawn*). Look for old iron gates, pieces of fencing, old doors. They are authentic and add lots of character & texture! (photo BHG)

I usually don't like plates on walls, but this arrangement speaks to me! I love that it is very vertical and a lot of plates! You can get inexpensive plates at Homegoods, Marshall's, etc. I think the colors should coordinate, but don't have to be matchy-matchy as shown in the picture. (photo BHG)


How cool is this? These are panels of wallpaper secured at top and bottom with wood dowel rods and hung by ribbon. What an inexpensive way to make a BIG impact on your walls! (photo BHG)

I love this! This is framed fabric. You could also frame scrapbook papers or even giftwrap! (photo BHG)

My own attempt at a photography arrangement!

Great way to display a lot of family photos. I love how the frames don't match, but it still works! (photo BHG)

Another take on displaying lots of family photos; this time, in coordinating frames (for those of us who WANT to be eclectic, but still tend to go toward the matchy-matchy! Is there a help group for this? (photo BHG)

Search my archives for more great ideas!